Instructions for using the Pulsar Forward FN455 night vision device.
The technical specifications of the device are given in the product Pulsar Forward FN455 lehel.
Introduction
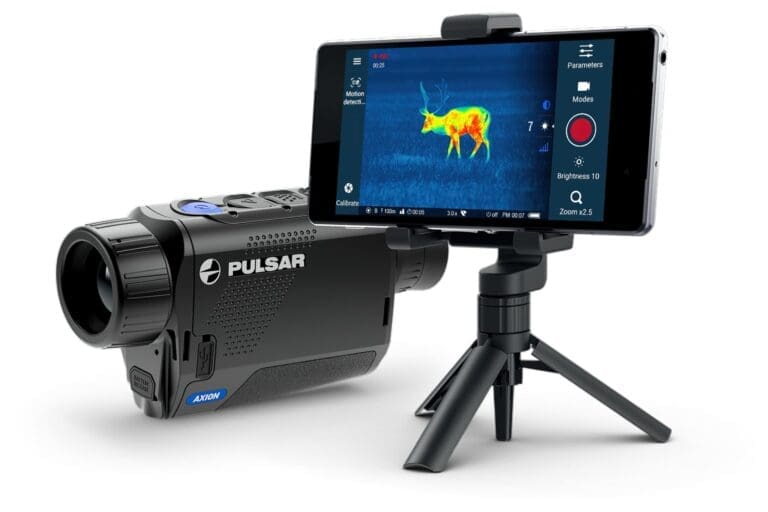
The Pulsar Forward FN455 is a night vision device designed for use in wildlife observation, hunting, security and night photography. The device allows you to record its screen images as photos and videos.
The device is intended to be used either alone or in combination with an optical device, such as a security camera, an optical viewfinder, etc. For stand-alone use, the appropriate viewfinder must be attached to the device. For use with optical devices, the viewfinder must first be removed and then attached to the optical device by means of an appropriate adapter. For more information on adapters, see the manufacturer's website.
Construction of the device
The diagram below shows the Night Vision Pulsar Forward FN455. The English equivalents are given below the diagram.
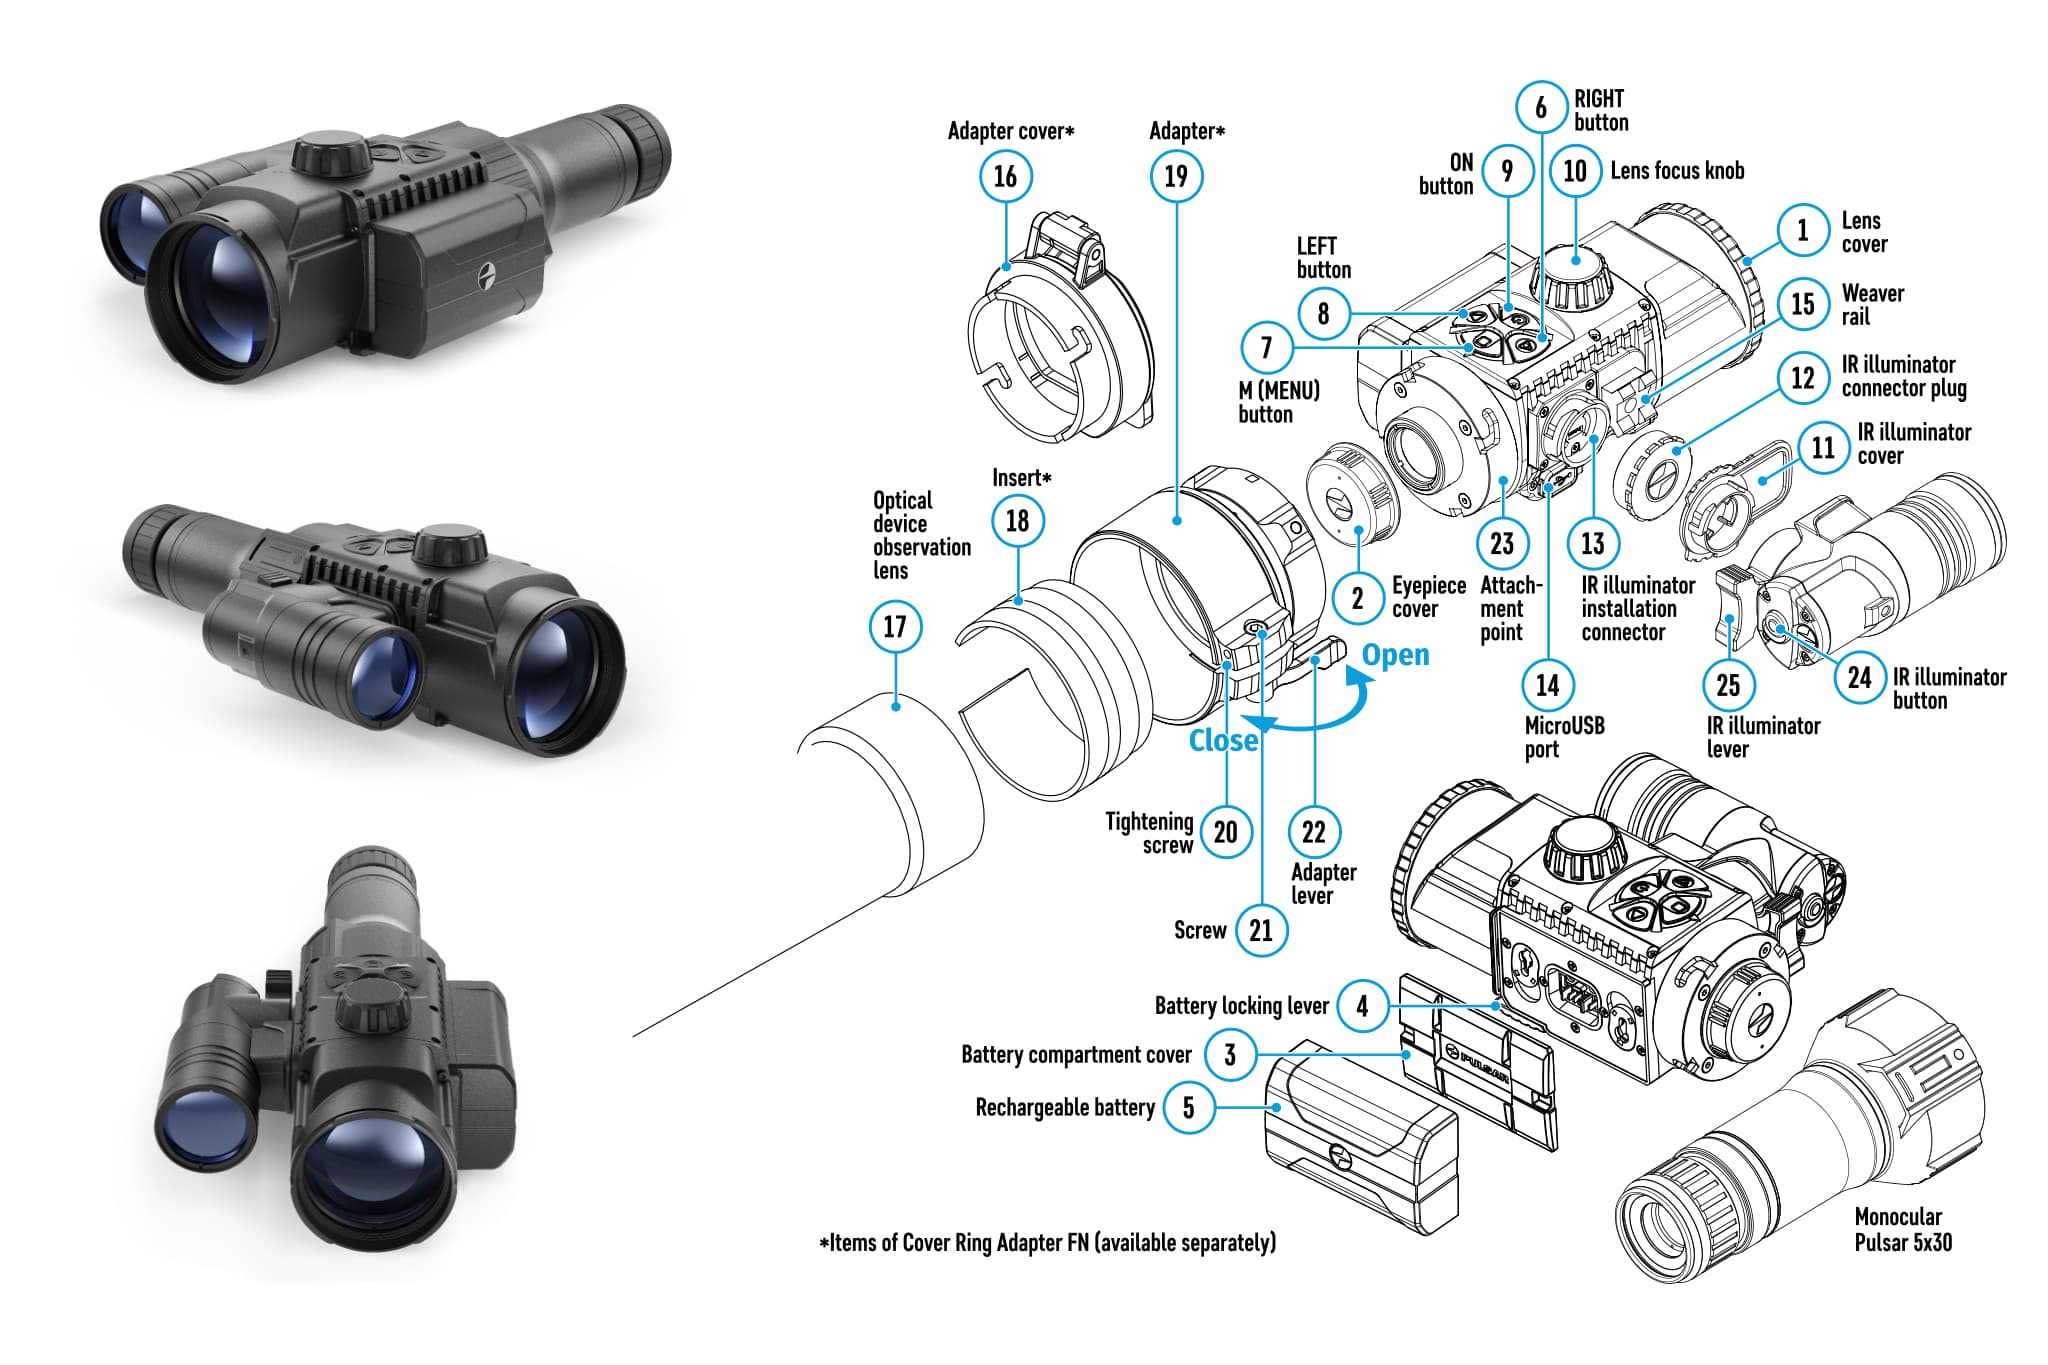
- Lens cap
- Eyepiece protection cap
- Battery cover
- Battery locking lever
- Aku
- Button PAREM
- Button M (MENU)
- Button VASAK
- Button SISSE
- Lens focus ring
- IR light connector protection cap
- IR light socket adapter
- IR light socket
- MicroUSB port
- Knitting fabric
- Adapter cover
- Optical device
- Liin
- Adapter
- Tightening screw
- Screw
- Adapter lock
- Adapter locking ring
- IR light on/off button
- IR light locking
- Battery locking lever
- LED indicator
- USB charging cable socket
- USB charging cable
- USB charger
- Power socket
Battery installation and charging
The device and the battery are separate in the factory packaging. The battery must be installed and charged before use.
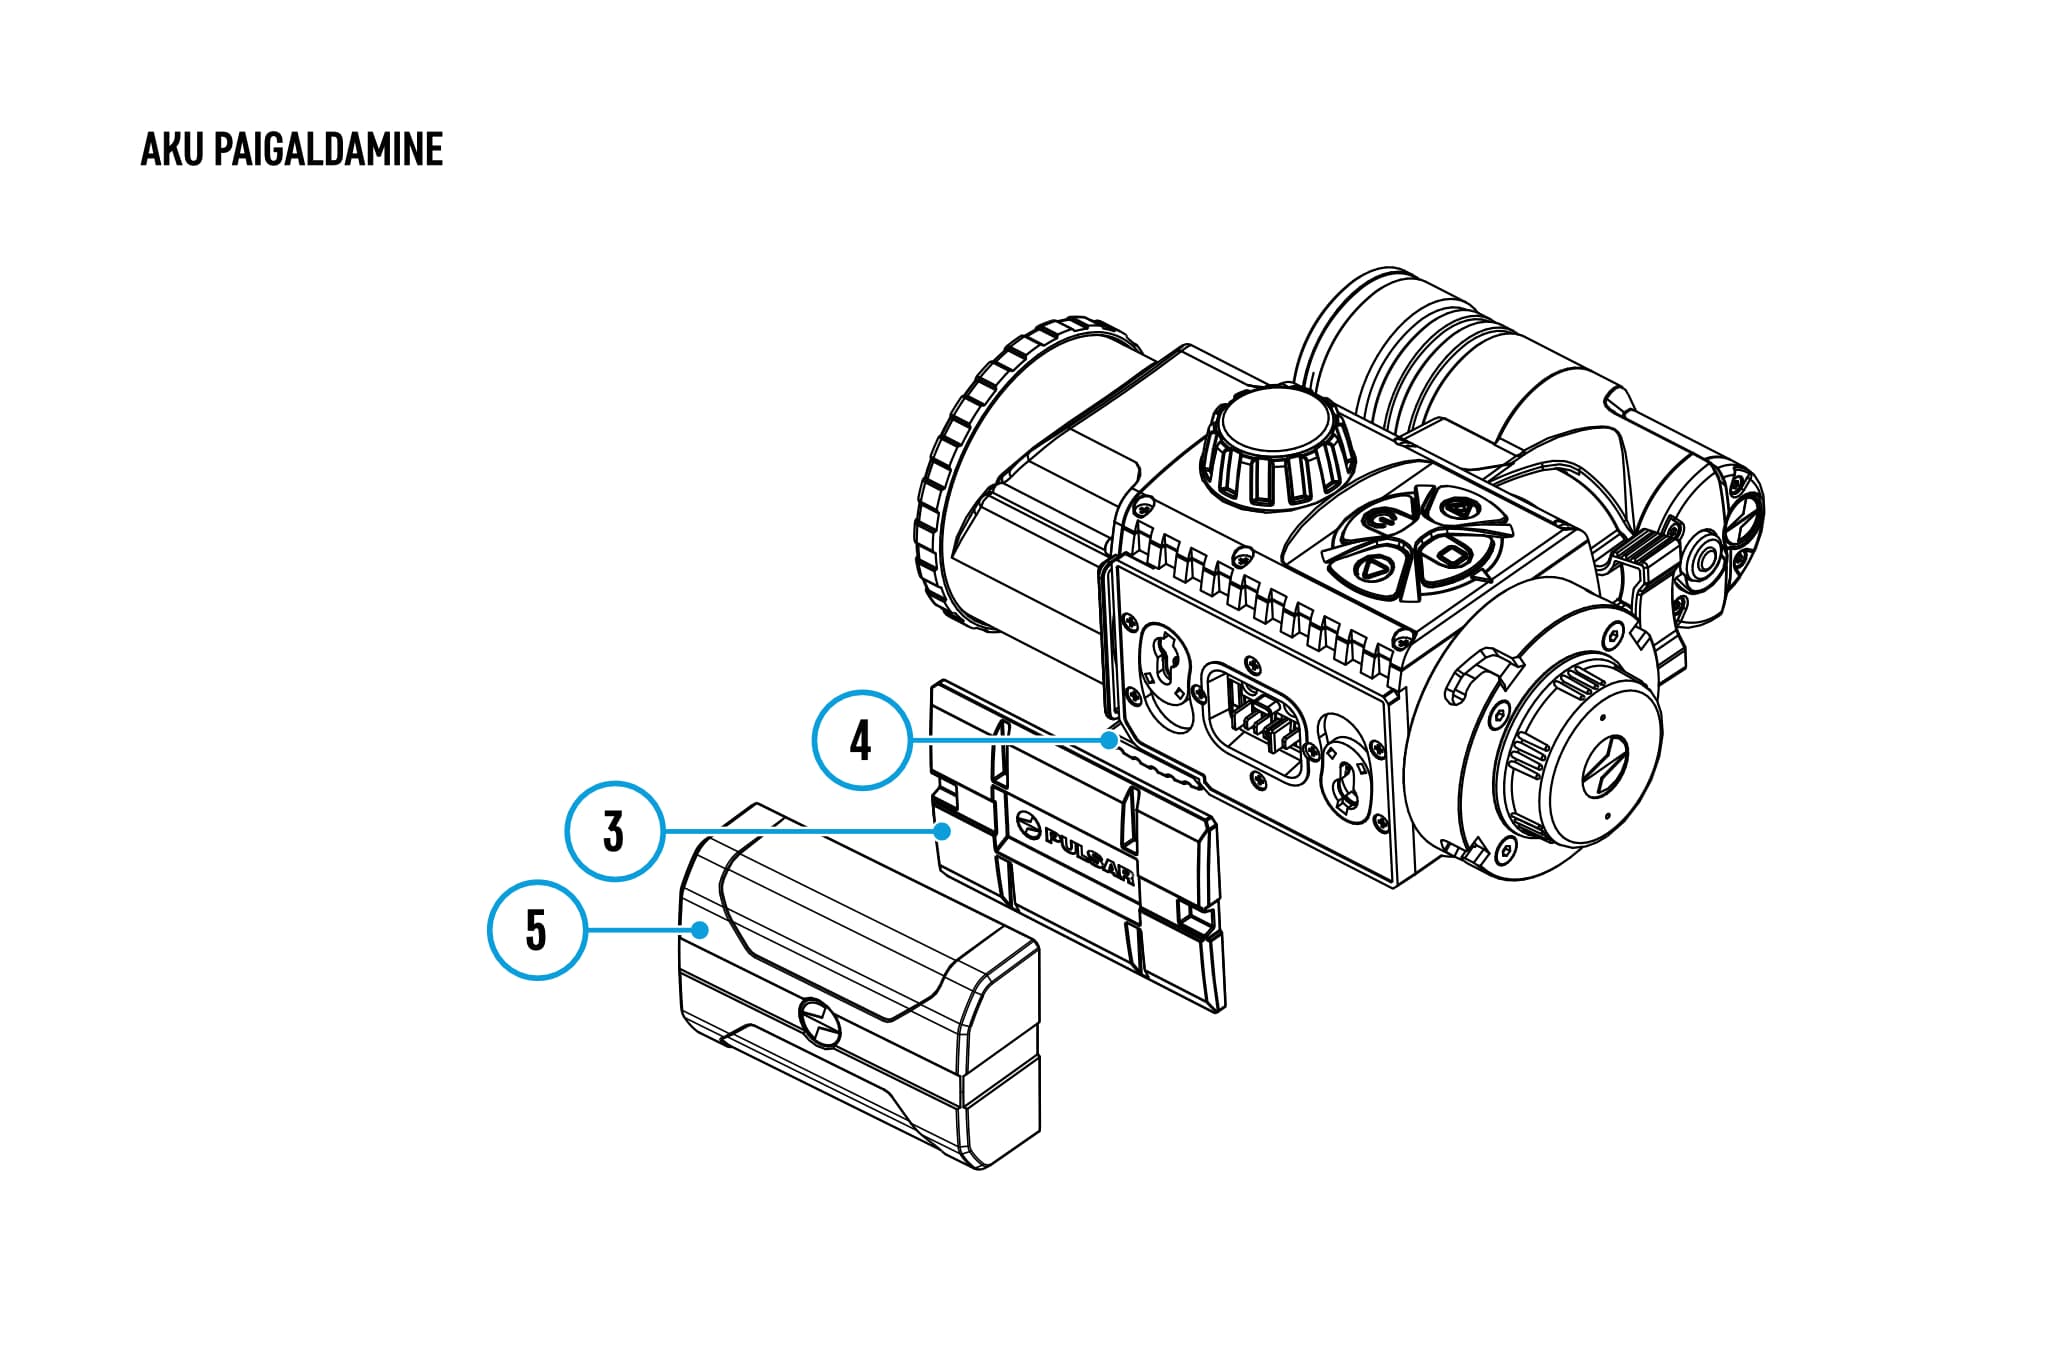
For battery installation:
- open the battery lock,
- remove the battery cover,
- remove the battery cover,
- install the battery in the battery compartment and
- lock the battery (by closing the lock lever).
It comes with a single IPS5 battery, which gives up to 9 hours of battery life when fully charged.
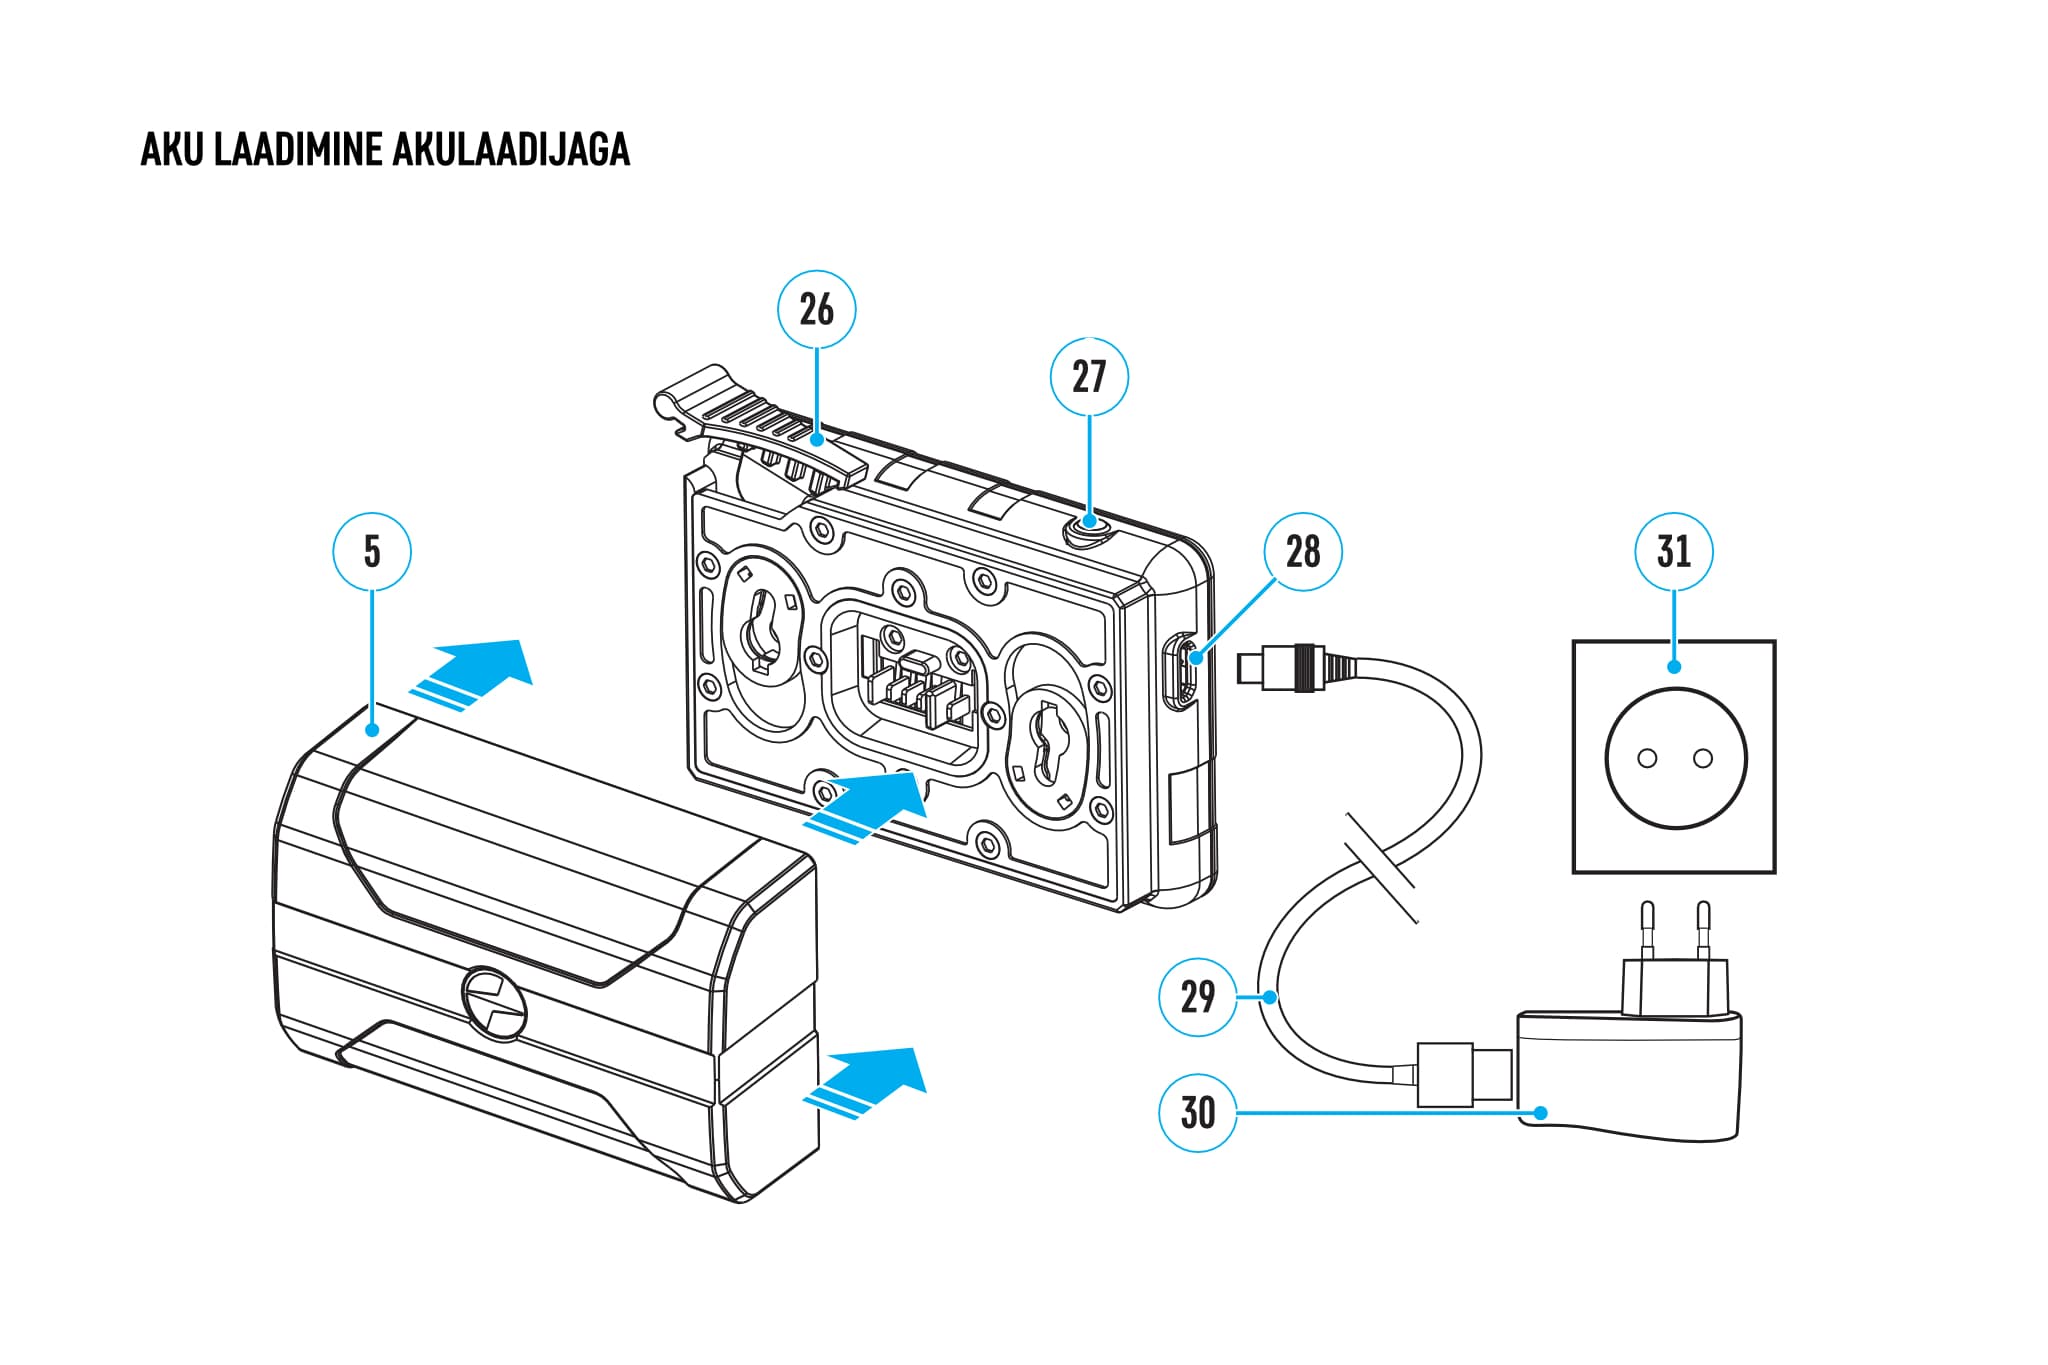
To charge the battery, always use either the battery charger that came with the product or the Pulsar IPS battery charger. To charge the battery, connect the charger cable to the charger board. Place the battery on the charger plate. The battery is fully charged when the charging indicator lights a solid green light. If the charging indicator is flashing, the battery is either discharged or partially charged: 1x = 0-50%, 2x = 51-75%, 3x = 76%-99%.
A red light on the charge indicator means that the battery has either not been charged for a long time or is faulty. If this is the case, leave the battery in the charger for a few hours, remove and then reinsert it. If the red light is still on, the battery is dead and needs to be replaced.
NOTE: Batteries must not be charged in conditions where the temperature is below zero degrees. Do not leave the battery and the charger unattended during charging.
Switching the device on and off
NOTE: The device is designed for use in the dark and should not be used in bright light. To switch the device on, press the button briefly. SISSE (#9). To switch off the device, press and hold (approx. 4 seconds) the button. SISSE.
Please make sure that you switch off the device after use to avoid draining the battery.
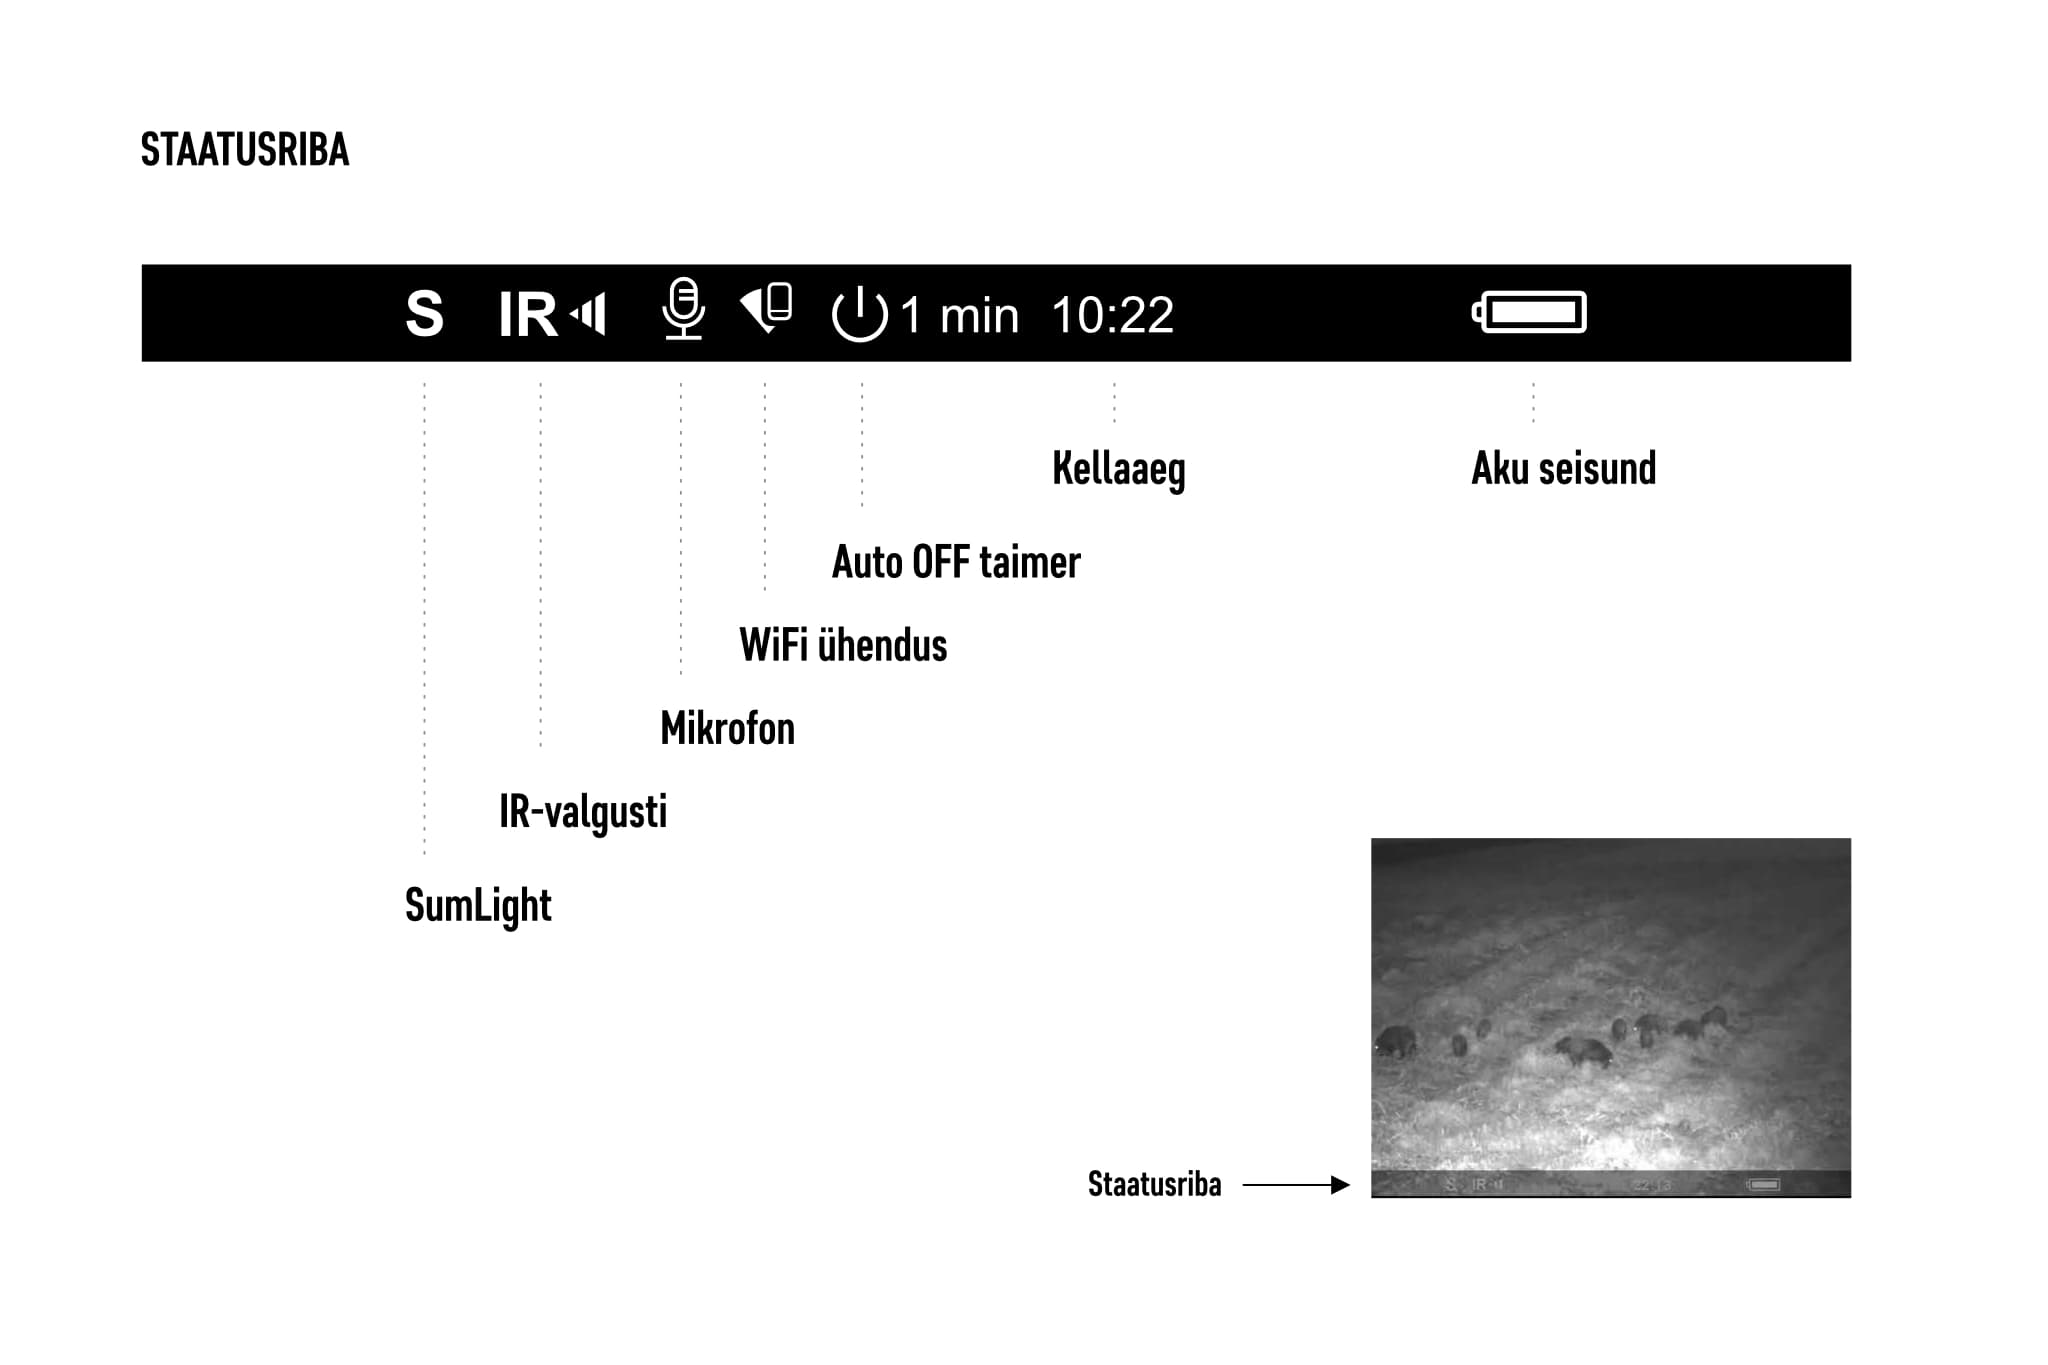
At the bottom of the night-vision screen is a status bar showing which functions are on and their status, as well as the time and battery level.
Image sharpening
When using the viewfinder for the first time, you should adjust the viewfinder according to your vision, which is done by a ring at the rear end of the viewfinder. For focusing the camera image, there is a focus ring (#10) on the top of the unit that adjusts the focal length of the lens. The focal length must be set according to the distance of the subject from the device. If the distance of the objects to be observed changes during the observation, the focal length must be readjusted.
WiFi connection
A WiFi connection is required if you want to use the Stream Vision app to download media files to your smart device, monitor your camera image from your smart device, or control your device directly from your smart device. By default, WiFi is turned off. If you are not using the device with a smart device, it is useful to turn off WiFi to extend battery life.
To switch the WiFI module on or off, press and hold the button. VASAK (#8). You can tell whether WiFi is on or off by the indicator at the bottom of the device's screen. If there is no WiFI icon on the status bar of the device, the WiFi module is switched off.
To connect your smart device to the night vision device, you need to go to the WiFI connections settings on your smart device and connect your smart device to the WiFi network created by the night vision device. The name of the WiFI network for the night vision device is “Forward F_XXXX”, where XXXX is instead the last four digits of your device's serial number, for example “Forward F_2651”.
System settings can be controlled from a smart phone via the Stream Vision app, provided that “Owner” is selected as the WiFi settings permissions setting.
Night Watch settings
The Pulsar Forward FN455 settings are divided into two groups - general settings and system settings. The general settings are displayed via the quick menus (quick menu) by briefly pressing the button M (#7). To access the system settings, you have to go to the menu by pressing and holding the button. M (#7) until the corresponding menu appears on the screen.

Quick options
In quick options, you can adjust the brightness and contrast of the image using the buttons VASAK (#8) and PAREM (#6). Press the button M (#7) toggles between brightness and contrast adjustment. The brightness and contrast should be set according to what is most comfortable and least tiring to the eyes.

Brightness
Brightness is the luminous intensity of an image. The higher the brightness, the brighter the image appears; the lower the brightness, the darker the image appears. The device allows you to choose between up to twenty brightness levels (0-20).

Contrast
Contrast is the ratio of the lightest colour to the darkest colour. The higher the contrast, the clearer the difference between dark and light tones. The device allows you to choose between up to twenty contrast levels (0-20).
System settings
The system settings menu options can be navigated by pressing the buttons VASAK (#8) and PAREM (#6). To confirm the selection, press the button briefly. M (#7). The sink must then be VASAK (#8) and PAREM (#6) to select the desired setting. In order to confirm the selection or to exit from the setting, press the button once again. M (#7).
![]()
Menu/icon brightness
To adjust the brightness of icons and text on the screen, you must select the “Icon Brightness” setting.

Switching the microphone on and off
The device has a built-in microphone, the sound of which is recorded with the video when the microphone is switched on. To change the setting, select “Microphone” from the menu.

WiFI provisions
There are two sub-options in the WiFi setup: WiFi password and WiFi permissions. To change the settings, you need to select “Wi-Fi Settings” from the menu.
WiFI password
To change your Wi-Fi password, go to Wi-Fi Settings and then Password setup. The default password is 12345678, which you can change to a password that suits you.
WiFi access rights
By setting up WiFi permissions, you can control whether the Stream Vision app can be used to modify system devices on your device. To change access levels, select Wi-Fi Settings from the menu, then Access level setup.
If you want to change the settings of your device from your smartphone, you must select the “Owner” setting. If you want to disable the settings from the Stream Vision app, you must select “Guest”.

General settings
In the general settings, you can change the device language, date and time, and format the internal memory. To exit from the general settings, select “Return to default settings” and press the M button.
Language
You can select English, French, German, Spanish or Russian as the device language (Language). By default, the device language is English.
Date of
The Date is the date in the format day/month/year (e.g. 18/08/2021).
Time
The time (Time) is displayed on the device status bar. The status bar also remains for photos and video recordings. In addition to setting the time, you can choose to display the time in 24-hour format or AM/PM format.
Preview
The Format function resets the internal memory. This operation deletes all files stored in the internal memory.

Automatic switch-off
If automatic switch-off is enabled, the device will automatically switch itself off if it has not been in the operating position for some time. The operating position is considered to be the horizontal position of the device.
If automatic switch-off is enabled and the unit is in a vertical position with an angle greater than 70° or in a lateral position with an angle greater than 30°, the unit shall be switched off after the switch-off timer has reached zero. In the event that the device is returned to the operating position before the automatic switch-off, the switch-off timer shall be reset and shall only start again when the device is moved out of the operating position again.

Device data
From the “Device Information” menu, you can view various information about the night-vision device: name, SKU number, serial number, software version, hardware version and service information.
IR luminaire installation
The Pulsar FN455 night vision camera comes with an additional IR or infrared (940 nm) light that can be easily added/removed. Other Pulsar IR illuminators can also be fitted (to be purchased separately). The IR light improves visibility, especially in dark conditions. The IR beam is invisible to the human eye.

for the installation of IR lighting:
- remove the protective cap (#12) from the night vision device,
- remove the protective cap (#11) from the IR light,
- connect the IR light to the night vision device (#13),
- lock the IR light by pushing down the locking lever (#25); and
- switch on the device and check that the IR symbol appears on the status bar.
To switch on the IR light, press the button on the back of the IR light (#24). By repeatedly pressing the button when the IR light is switched on, it is possible to adjust its intensity. Adjust the intensity of the light according to your needs. To switch off the IR light, press and hold the light button for a few seconds.
NOTE: The IR symbol will not be displayed on the status bar if the IR light is not connected or is connected incorrectly.
Photography and video filming
The device is equipped with an image capture and video recording function. Pictures and videos are stored in the internal memory of the device. It is not possible to take pictures and record movies at the same time, and you must first select which recording mode the device will operate in. To change the recording mode, press and hold the button. PAREM (#6) until the icon in the top right corner of the screen changes.
Image copyright first select the shooting mode on your device (camera icon in the top right corner of the screen). To take a picture, press the button briefly PAREM (#6), after which the screen image is “frozen” for half a second, during which time the image is converted into a file and stored in the built-in memory.
For video first select the filming mode on your device (the camcorder icon will appear in the top right corner of the screen). To start filming, press and release the PAREM (#6), at which point the camcorder icon disappears, followed by a red dot with the recording timer (MM:SS - minutes:seconds). To stop video recording, press and hold the button PAREM (#6) until the recording indicator replaces the camcorder icon.
NOTE: If you want to record audio with the video image, please turn on the microphone beforehand.
SumLight function
In particularly difficult lighting conditions, the SumLight function can be used. The SumLight function increases the sensor's luminosity, but at the same time reduces the frame rate, which causes the image to “stretch”. The SumLight function also increases image noise.
To switch on the function, press the button briefly. VASAK (#8). To disable the function, press the button again. VASAK (#8). The status of the SumLight function is indicated by the S symbol in the status bar at the bottom of the screen. The crossed out S symbol means that the SumLight function is disabled.
Connecting to a computer
Image and video files stored on the internal memory of the device can be downloaded from the device to your smart device via the Stream Vision app over a WiFi connection. With a USB connection, the device can be connected to a computer, where the internal memory of the device is automatically displayed as external storage. There is no need to install any additional software on the computer to connect to the PC.
To connect to a computer:
- turn on the device;
- connect your device to your computer with a USB cable;
- a selection is displayed on the screen:
- Use as power,
- Use as memory card;
- select buttons VASAK/PAREM using “Use as memory card” and confirm it by pressing the button. M;
- your computer automatically recognises the device and adds it as an external storage device.
Open the device's memory in File Manager and copy the files you want to your PC. You can delete files from the storage device after copying to make extra space for new files.
NOTE: AVI format video files cannot be viewed with QuickTime player on MacOS platform. For this purpose, we recommend using the free video player. IINA. To convert video files to MP4 or other formats, we recommend using the free app. HandBrake.
Storage/maintenance
Storage means storing the equipment for periods of time when it is not in use.
During non-observational times, the lens should always be covered with a protective cap to avoid chafing, abrasions, etc.
After using the appliance, it should be dried with a dry, clean towel or household paper. The optics, the eyepiece and the IR light must be cleaned and dried gently with an optics cleaning cloth. The lens and eyepiece must not be scratched/rubbed. Lens cleaning accessories and tools for cleaning photographic camera lenses may be used.
The device should be stored in a dry and dark place, out of the reach of children.